Traveling with a nonverbal child can be challenging, but with the right preparation and tools, it’s possible to make trips smoother for everyone. Here’s a quick guide to help:
- Start Early: Prepare weeks in advance with visual schedules, social stories, and practice runs for travel routines.
- Pack Smart: Bring communication aids like picture cards, AAC devices, and sensory comfort items. Don’t forget chargers and backups.
- Use Low- and High-Tech Tools: Combine printed cards for quick needs with AAC apps for complex communication.
- Work with Staff: Inform airline and hotel staff ahead of time about your child’s needs. Use resources like TSA Cares and autism alert cards.
- Handle Meltdowns Calmly: Recognize early signs, use sensory tools, and create a quiet space when needed.
Autism on an Airplane | Sensory Issues |Travel Tips for Autism
sbb-itb-d549f5b
Preparing Communication Tools Before Your Trip
Getting ready for a trip weeks in advance can make all the difference, especially for children with Autism Spectrum Disorder (ASD). Early preparation helps your child process what’s ahead and reduces anxiety about unfamiliar situations. Since about 25%–30% of children with ASD develop minimal or nonfunctional language [8], having the right communication tools can transform a chaotic trip into a smoother experience. Here’s how to get started.
Making Visual Schedules and Social Stories
Visual schedules break down the trip into clear, manageable steps, helping your child understand what to expect. These schedules can be as simple as picture boards with images your child can point to or rearrange. Using Velcro to attach the images lets your child actively participate in organizing their own schedule [9]. You can personalize these tools with photos of your destination, like the hotel lobby or the beach, and add familiar phrases or vocabulary your child already knows [7][10].
For tech-savvy kids, video modeling can be a game-changer. High-tech AAC devices or short videos showing kids navigating airport security or boarding a plane can help your child visualize and prepare for similar situations [10]. Practicing these scenarios at home with these visual aids builds familiarity and confidence for the real thing.
Practicing Travel Situations at Home
Rehearsing travel routines at home can make new experiences feel less overwhelming. Create a pretend security checkpoint where your child practices placing items in a bin, walking through an imaginary scanner, and sitting in a chair with a seatbelt on for longer periods. Involve them in packing and unpacking their own bags to reduce surprises when their belongings disappear into suitcases.
YouTube videos that show airport walkthroughs can also help your child get used to the sights and sounds of travel. Some families even take "practice runs", like short car trips with luggage, visits to local train stations, or overnight stays at nearby hotels. Many airports also offer flight rehearsal programs, allowing families to simulate the experience of checking in, passing through security, and boarding a stationary plane [1][3]. Starting these rehearsals early gives your child more time to adjust.
Packing Your Communication Toolkit
Your travel toolkit should include all the communication aids your child uses at home. Pack visual schedules, social stories, and picture cards (PECS). If your child uses a tablet or AAC device, bring extra portable chargers and batteries – nothing disrupts communication more than a dead device [1][3]. A "transition bag" filled with comfort items like a favorite stuffed animal, familiar books, a small pillow, and snacks can also help regulate emotions during stressful moments. Pediatric occupational therapist Larissa Geleris explains:
"Crunchy and chewy foods give sensory input into the mouth. The act of chewing pushes resistance deep into the ligaments and tendons of the teeth and jaw to release serotonin, which supports regulation" [4].
Don’t forget safety essentials. Pack a wearable ID bracelet, a recent photo of your child (taken the morning of travel) showing what they’re wearing, and a doctor’s letter outlining their diagnosis and medications [1]. Print a TSA Notification Card to discreetly inform security agents of your child’s needs, and contact the TSA Cares hotline at least 72 hours before your flight for additional screening support [1][3]. Having these tools ready ensures you’re prepared to handle challenges calmly and efficiently.
Choosing Between Low-Tech and High-Tech Communication Tools
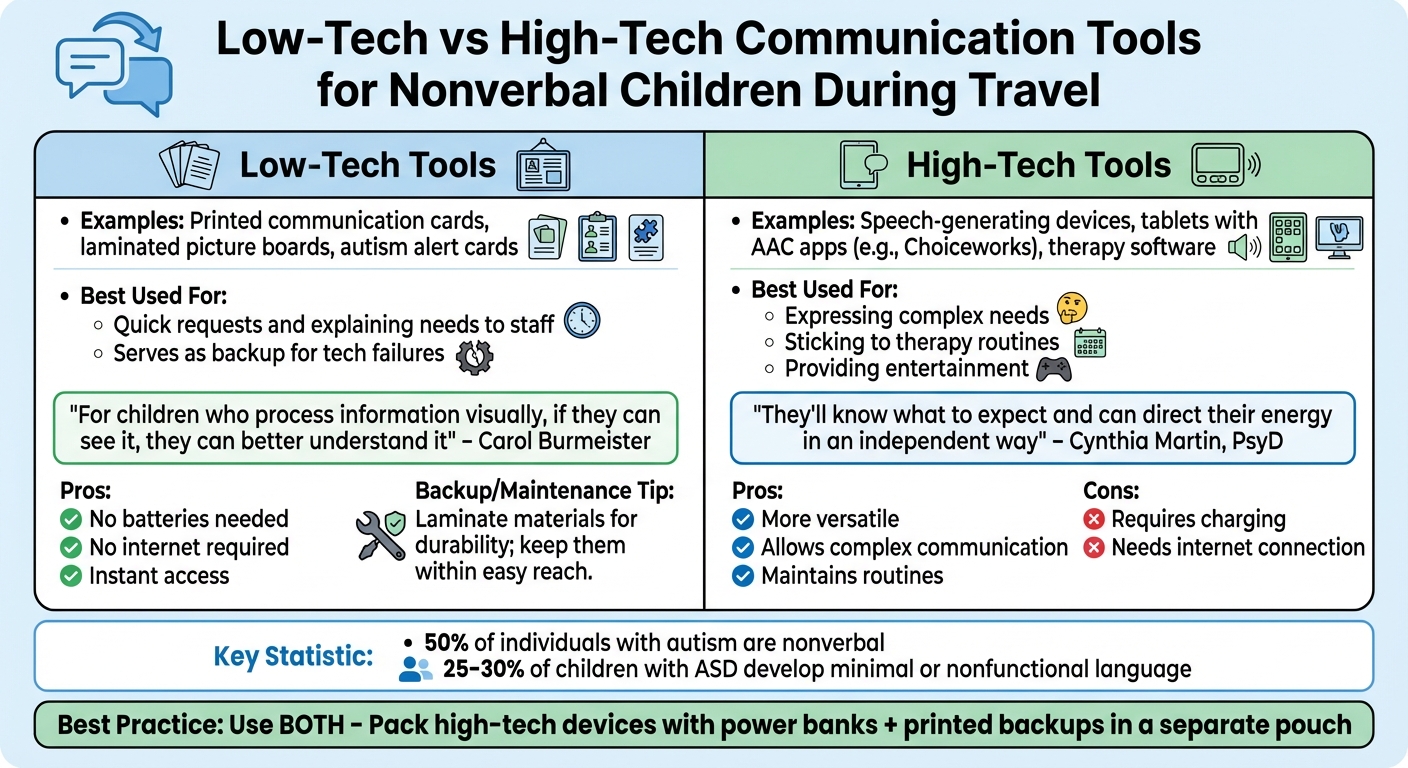
Low-Tech vs High-Tech Communication Tools for Nonverbal Travelers
Using a mix of low- and high-tech communication tools can help you stay prepared when plans change unexpectedly. With around 50% of individuals with autism being nonverbal [5], having multiple communication options available can make a big difference in ensuring your child feels supported during travel. Building on your pre-trip preparations, selecting the right combination of tools can provide consistent support throughout the journey.
Low-tech tools – like printed communication cards, laminated picture boards, and autism alert cards – are simple, reliable, and don’t rely on batteries or internet. They’re perfect for quick interactions, such as explaining your child’s needs to a flight attendant or TSA agent. A "wait card" or a communication passport can be handed over in seconds, making communication faster and easier. Carol Burmeister, an experienced educator, shares:
"For children who process information visually, if they can see it, they can better understand it" [11].
High-tech tools, on the other hand, offer more versatility. Devices like speech-generating gadgets, tablets with AAC apps (e.g., Choiceworks), and therapy-focused software allow your child to express more complex needs and stick to their routines. Cynthia Martin, PsyD, highlights their value:
"They’ll know what to expect and can direct their energy in an independent way" [6].
However, these tools do come with challenges. They need regular charging and often depend on a stable internet connection, which may not always be available during travel.
To avoid disruptions, pack high-tech devices in an accessible backpack along with portable power banks, and make sure to download offline versions of essential apps in advance. At the same time, carry printed backups – such as laminated communication cards, visual schedules, and alert cards – in a separate pouch. This dual approach can help reduce stress if tech issues arise and keep communication running smoothly.
| Tool Type | Best Used For | Backup/Maintenance Tip |
|---|---|---|
| Low-Tech | Quick requests and explaining needs to staff; serves as a backup for tech failures | Laminate materials for durability; keep them within easy reach |
| High-Tech | Expressing complex needs, sticking to therapy routines, or providing entertainment | Include power banks; download apps for offline use |
Next up, explore how to put these tools into action during your trip to ensure smoother communication with staff and easier navigation through travel challenges.
Communicating Effectively During Your Trip
Using Visual Icons and Gestures
When you’re traveling, visual icons and gestures can make transitions much smoother. For example, a visual schedule that outlines each step – packing, driving, going through security, boarding, and arriving – can help your child understand what to expect next [3].
Social stories are another helpful tool, especially during moments that might feel overwhelming, like waiting in line or boarding. These could be in the form of a personalized picture book or a set of digital slides that explain each step in advance [2][3]. On road trips, visual countdowns work great to show how long it will be until the next stop [2]. If your child feels stressed during a transition, simple gestures like deep hand massages or wiggling their toes can help them relax and move out of a "fight-or-flight" state [4].
It’s also a good idea to keep printed cards handy. Autism alert cards or disability ID cards can quickly inform staff or others that your child may need extra time or might not respond right away [2]. These tools not only aid communication but also help you get support from airline or hotel staff when needed.
Working with Airline and Hotel Staff
Once you have your communication tools ready, reaching out to staff can make travel transitions much easier. Before your trip, contact guest services for airlines, train stations, or hotels to explain your child’s sensory and communication needs. If you’re flying, you can call TSA Cares at least 72 hours in advance to arrange guided assistance through security [6][3].
You might also consider using the Hidden Disabilities Sunflower Lanyard. This signals to trained staff at over 240 airports worldwide that your child has a non-visible disability [6]. On the plane, let flight attendants know about your child’s needs so they can provide discreet help. At the hotel, request a quiet room away from elevators or other sensory triggers, and inform the staff about specific accommodations your child might need.
To make things even smoother, carry pre-written notes or a communication passport. These can explain that your child is nonverbal or may have delayed responses, along with any specific behavioral needs [12]. Handing these notes to staff when needed ensures everyone is on the same page, making the journey more manageable for everyone involved.
Handling Difficulties and Learning from Each Trip
Managing Communication Breakdowns
When your child has a meltdown during travel, it’s important to recognize that this isn’t a tantrum – it’s an involuntary reaction to sensory or emotional overload. Unlike tantrums, which are intentional and stop once a child achieves their goal, meltdowns persist regardless of external factors and cannot be managed with discipline or rewards [13].
Meltdowns generally follow three phases: rumbling (early warning signs like increased stimming or muscle tension), rage (a complete loss of control), and recovery [13]. During the rumbling phase, you can often intervene by using tools from your sensory comfort kit. Techniques like firm arm squeezes or using a weighted blanket can help release serotonin, which soothes the nervous system [13][4]. Offering crunchy or chewy snacks can also provide calming sensory input.
If the meltdown reaches the rage phase, the best course of action might be to move your child to a quiet, secure space and allow the episode to pass naturally [13]. It’s equally important to manage your own emotions during these moments. Geleris explains:
"When you approach these difficult moments with self-compassion… you actually start to shift your nervous system into a state of safety, which allows you to access your thinking-brain again and come up with a plan" [4].
Tracking Travel Behaviors with Guiding Growth
Once the immediate meltdown has passed, tracking behaviors can help connect short-term challenges to longer-term strategies. The ABC method – Antecedent, Behavior, Consequence – can help pinpoint specific triggers. For example, note what happened before the meltdown, how your child reacted, and what followed [13]. You might find that airport security lines consistently cause anxiety or that late afternoon transitions are particularly tough.
The Guiding Growth app can make this process easier by logging behaviors, health patterns, and activities throughout your trip. Over time, these logs reveal patterns, helping you make better decisions for future travel. The app also generates detailed reports you can share with healthcare providers, giving them valuable insights into your child’s travel-related challenges and successes.
Reviewing What Worked for Next Time
Using the observations you’ve logged, conduct a structured review to refine your travel strategies. The SOARR framework – Specify, Observe, Analyze, Respond, Reflect – offers a clear way to evaluate your experiences [11]. Ask yourself: What worked well? What could be improved? What changes might make the next trip smoother?
Focus on which tools and strategies were most effective. For example, if noise-canceling headphones helped avoid meltdowns, make them a priority for future trips. If visual countdown timers eased transitions, ensure you have extras on hand. You might also consider adjusting your itinerary – if the trip felt too rushed, plan for more downtime next time to help your child stay calm [4]. Each trip, no matter how challenging, builds your confidence and helps you prepare for the next adventure with greater ease.
Conclusion
Traveling with a nonverbal child takes thoughtful preparation, adaptable communication strategies, and a willingness to learn from each experience. Every trip helps you build confidence as you fine-tune your approach – whether that means using visual schedules, trying out different communication tools, or packing sensory supports to ease anxiety. Even small milestones, like your child independently reaching for noise-canceling headphones, can feel like big wins.
After each journey, take a moment to evaluate what worked well and what could be improved. For instance, travel writer Talia Salem shared how forgetting her daughter’s favorite stuffed bunny during a family trip to Monterey, California, in April 2025, led to a couple of tough nights. That experience inspired her to create an "essential toys" checklist, ensuring smoother travels in the future.
Tools like the Guiding Growth app can make this reflection process easier by helping you track behaviors, health patterns, and activities during your trip. Over time, these insights can guide better travel decisions and even provide detailed reports to share with healthcare professionals. With resources like these, each trip becomes an opportunity to prepare more effectively for the next.
While traveling with a nonverbal child can feel daunting at times, your growing set of strategies and resources makes each adventure a little easier. With preparation, patience, and the right tools, travel can become a meaningful way to support your child’s development and strengthen your family’s connection.
FAQs
How do I choose the right AAC tools to bring on a trip?
When preparing for a trip, choose portable and user-friendly AAC tools that suit your child’s specific needs. Options like picture boards, communication apps, or speech-generating devices are often effective. Always make sure devices are fully charged and consider bringing backup tools, such as printed visuals, to handle any unexpected malfunctions. It’s a good idea to practice using these tools with your child beforehand. This helps them feel more at ease, making communication smoother and reducing potential frustrations during your travels.
What should I do if my child’s AAC device dies or loses service?
If your child’s AAC device malfunctions, it’s important to have alternative communication methods on hand. Tools like visual supports – such as picture schedules or communication boards – can be incredibly helpful. Encourage your child to use gestures, facial expressions, or body language to convey their needs. By practicing these alternatives regularly, your child will feel more confident using them in a pinch, helping maintain consistent communication even when the device isn’t working.
How can I quickly explain my child’s needs to TSA, airline, or hotel staff?
When explaining your child’s needs, keep it straightforward and easy to understand. For example, you might say: "My child is nonverbal and sensitive to loud noises. Are there any quiet areas or sensory-friendly options available?"
Another helpful idea is to carry a communication card that briefly outlines your child’s needs. This can make it easier for staff to quickly understand how to assist and offer the right support. Simple tools like these can go a long way in ensuring your child feels comfortable.